Although the big fish in the sea is still Internet Explorer, followed closely by FireFox. Due to the popularity of Open Source development more and more browsers are taking over Micrsofts lead.
I have to say at first glance Google Chrome is a great looking browser, excellent use of tabs as both not just a navigation aid but as a design tool.
I can also see that all of my code works immediately in Google Chrome which means that at first BETA release the new browser on the block is fully complient, so if you code is complient then it should work first time.
I will write more when I have had a time to play with the new kid on the block.
Thanks
Sean J Connolly
Visit AJAX Web Development Store
DMS - Document Management, Webmail
BuzzProperties.co.uk - Online Property Sales and Letting
Tuesday, 23 September 2008
Monday, 2 June 2008
How to Reset Your Blog
If you are having problems with blogger, and things aren't working quite right. You may be able to fix the problem by resetting your blog.


Your blog is now reset and you can continue posting as normal.


You will now see that the you have a template tab in place of the layout tab, this means you have successfully reset your blog
Your blog is now reset and you can continue posting as normal.
By resetting your blog will not lose you any posts you made.
How to Reset Your Blog
The first thing you need to look at is the current layout of your blog, it will be either one which you have a template tab or one on which you have a layout tab.
Template Tab Blog


If you have a blog that when you go into your dashboard and blog you see the tabs and links shown above, the posting, setting and template links. To reset your blog you do the following
1. Click on the Template link from your dashboard or Template tab from your blog.


2. Click on the Customise Design tab


3. Click on the Upgrade Your Template button in the middle of the screen


4. Select a new template from the templates on screen and click on the save template button
Your blog will now change to show you page elements and give you tabs for posting, settings and layout.
Your blog is now reset and you can continue posting as normal.
Layout Tab Blog


If you have a blog that has a posting, settings and layout links on the dashboard or tabs on your blog like those aboe. To reset your blog you do the following.
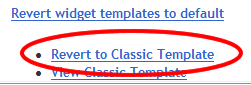
1. Click on the layout link from the dashboard or tab in your blog


2. Click on the Edit HTML tab

3. Near the bottom of the screen, under the box with the HTML code in it you will see a link that says Revert to Classic Template, click it.

3. Near the bottom of the screen, under the box with the HTML code in it you will see a link that says Revert to Classic Template, click it.

4. You will get a popup appear, click OK

You will now see that the you have a template tab in place of the layout tab, this means you have successfully reset your blog
Your blog is now reset and you can continue posting as normal.
Sean J Connolly
Visit AJAX Web Development Store
Visit AJAX Web Development Store
DMS - Document Management, Webmail
BuzzProperties.co.uk - Online Property Sales and Letting
BuzzProperties.co.uk - Online Property Sales and Letting
Friday, 23 May 2008
RSS Directories & Blog Directories
After many hours of surfing around the web I have found some great places to submit your RSS feed
Feedburner.com - Great site to create and manage your blog stats and feed
RSS Network
Syndic8
RSS News Feed Directory
CompleteRSS
RSS Feeds
Feedster
Search4RSS
Finance Investing
FeedPlex
http://add.yahoo.com/fast/help/us/my/cgi_rss_submission
RSS Locator
ping.in - this is a way of informing the world about changes to your blog
There are also a few places to submit your actual blog
http://www.bloggingfusion.com/submit.php
http://www.technorati.com/ping.html
http://www.icerocket.com/c?p=addblog
http://www.addyourblog.com/submit.php
http://www.blogdigger.com/add.jsp
http://www.blogexplosion.com/
http://www.google.com/addurl/
for a full list why not visit http://www.toprankblog.com/rss-blog-directories/ if you want to just submityour blog or rss to the whole world.
I do not intend to list all the blog or RSS directories out there, but I will list the ones I have found that actually work and bring traffic to your blog.
So stay tuned
Thanks
Sean J Connolly
Visit AJAX Web Development Store
DMS - Document Management, Webmail
BuzzProperties.co.uk - Online Property Sales and Letting
Monday, 19 May 2008
Ebay Partner Network and Blogger - Basic
I realised that I am too techy ad a lot of people out there don't want a techy answer to a techy problem. So I am going to explain how to change the code given by the Ebay Partner Network and make it work in Blogger.
1. Get you code from Ebay Partner Network
Looks like this
<script language='JavaScript1.1'> document.write("<sc"+"ript language='JavaScript1.1' src='http://rover.ebay.com/ar/1/55956/1?campid=5335857286&toolid=55956&customid=&mpt=" + Math.floor(Math.random()*999999999999) + "&adtype=3&size=468x60&def=u7v&n3y=1&u7v=1&a3h=1&mpvc='></sc"+"ript>");</script><noscript> <a href='http://rover.ebay.com/rover/1/710-53481-19255-7/1?campid=5335857286&toolid=55956&customid=&def=u7v&n3y=1&u7v=1&a3h=1&mpvc='> <img border='0px' src='http://rover.ebay.com/ar/1/710-53481-19255-7/1?campid=5335857286&toolid=55956&customid=&mpt=[CACHEBUSTER]&adtype=1&size=468x60&def=u7v&n3y=1&u7v=1&a3h=1&mpvc=' alt='Click Here'> </a></noscript>
2 . Remove the <noscript> section, leaving
<script language='JavaScript1.1'> document.write("<sc"+"ript language='JavaScript1.1' src='http://rover.ebay.com/ar/1/55956/1?campid=5335857286&toolid=55956&customid=&mpt=" + Math.floor(Math.random()*999999999999) + "&adtype=3&size=468x60&def=u7v&n3y=1&u7v=1&a3h=1&mpvc='></sc"+"ript>");</script>
3. Copy the Hyperlink (highlighted below)
<script language='JavaScript1.1'> document.write("<sc"+"ript language='JavaScript1.1' src='http://rover.ebay.com/ar/1/55956/1?campid=5335857286&toolid=55956&customid=&mpt=" + Math.floor(Math.random()*999999999999) + "&adtype=3&size=468x60&def=u7v&n3y=1&u7v=1&a3h=1&mpvc='></sc"+"ript>");</script>
The link looks similar to
http://rover.ebay.com/ar/1/55956/1?campid=5335857286&toolid=55956&customid=&mpt=" + Math.floor(Math.random()*999999999999) + "&adtype=3&size=468x60&def=u7v&n3y=1&u7v=1&a3h=1&mpvc=
4. Paste the link into the PUT YOUR LINK HERE section below
<script language="JavaScript1.1">
document.write(unescape("%3Cscript src='PUT YOUR LINK HERE' type='text/javascript'%3E%3C/script%3E"));
</script>
and end up with something that looks like
<script language="JavaScript1.1">
document.write(unescape("%3Cscript src='http://rover.ebay.com/ar/1/55956/1?campid=5335857286&toolid=55956&customid=&mpt=" + Math.floor(Math.random()*999999999999) + "&adtype=3&size=468x60&def=u7v&n3y=1&u7v=1&a3h=1&mpvc=' type='text/javascript'%3E%3C/script%3E"));
</script>
Now paste the <noscript> section remove above after this new section, to leave something that looks like.
<script language="JavaScript1.1">
document.write(unescape("%3Cscript src='http://rover.ebay.com/ar/1/55956/1?campid=5335857286&toolid=55956&customid=&mpt=" + Math.floor(Math.random()*999999999999) + "&adtype=3&size=468x60&def=u7v&n3y=1&u7v=1&a3h=1&mpvc=' type='text/javascript'%3E%3C/script%3E"));
</script>
<noscript> <a href='http://rover.ebay.com/rover/1/710-53481-19255-7/1?campid=5335857286&toolid=55956&customid=&def=u7v&n3y=1&u7v=1&a3h=1&mpvc='> <img border='0px' src='http://rover.ebay.com/ar/1/710-53481-19255-7/1?campid=5335857286&toolid=55956&customid=&mpt=[CACHEBUSTER]&adtype=1&size=468x60&def=u7v&n3y=1&u7v=1&a3h=1&mpvc=' alt='Click Here'> </a></noscript>
Now just paste this into blogger and you should have Ebay Partner Network Ads on your blogger blog.
If you have any problems using this code, or need more help, just drop a comment and I will give you a helping hand.
Saturday, 10 May 2008
301 - 301, 404, 500 What does it all mean?
I started thinking about the world and me heddy days as a cicso bod, yes I was a network engineer, I hold the coverted CCNP for my sins.
Now I have heard lots of talk in my current world of development about what response codes mean, from both a code point of view and a web SEO (search engine optimisation) point of view.
The normal thing to happen when a request for website or web object is made is that the server will give a response, and the response is a number reflecting the state of the intended destination.
We have all heard of the dreaded 404 - page not found.
The Response Codes
The response codes start at 100 and go up to 500. I am going to give an overview of the meaning of the most common types.
Note 1## means the 100 range.
1## - Anything in this range is purely an informational response and tells you the destination can receive a request. This is a part response and normally occurs dur to proxy before another response is returned.
2## - This means you had a successful response.
This mean you have permanently moved your website. If you do not select the permanent redirect option, the redirection will be seen as a temporary redirect or a 302.
4## - This mean a client error has occurred, such as it cannot find or get to where it was heading, and is most commonly cause by an incorrect link or a typo.
The most common type of 400 error is the 404.
About response codes
There are lots of error codes and this blog is aimed at giving you an idea of the most common ones and the causes of them.
Checking for response codes
If you are listening for a response code to be returned, teh best way is jsut to listen for the parent response, such as checked for a 200 reponse for a successful request.
Search Engine Listing and Redirection
The main things to take into consideration are when moving your website, and follow the instructions above to help you with your search engine listings, if you are moving your website make sure you do a 301 redirection.
Thanks
Sean J Connolly
Visit AJAX Web Development Store
DMS - Document Management, Webmail
BuzzProperties.co.uk - Online Property Sales and Letting
Now I have heard lots of talk in my current world of development about what response codes mean, from both a code point of view and a web SEO (search engine optimisation) point of view.
The normal thing to happen when a request for website or web object is made is that the server will give a response, and the response is a number reflecting the state of the intended destination.
We have all heard of the dreaded 404 - page not found.
The Response Codes
The response codes start at 100 and go up to 500. I am going to give an overview of the meaning of the most common types.
Note 1## means the 100 range.
1## - Anything in this range is purely an informational response and tells you the destination can receive a request. This is a part response and normally occurs dur to proxy before another response is returned.
2## - This means you had a successful response.
- 200 - Success - request was successful
The 200 response is the most likely success response, but there are also the following success responses
- 201 -Response was created succesfully
- 202 - Response was accepted.
- 203 - Response was successfuly but is non-authoritative.
- 204 - Response was successful but is enpty of content.
- 205 - Response was successful but the content sent has been reset.
- 206 - A partial response, only part of the content was returned.
- 207 - Successful but a multi status response, i.e in parts.
3## - This is a redirection, the client browser needs to do further action to reach content
This response is the most likely one to cause issues with your website in the search engines, if you are moving your website you should carryout a permanent redirect.
- 301 - Resource has moved permanently from this location (this redirection is normally done within the server software, not in the coding on the server)
There are other 300 response codes that you should be aware of
- 302 - Resource has been moved, this is seen as a temporary redirect (mornally done in server code)
- 304 - The resource is not modifed and neither is the path to it, normally seen by search engines when you use any proxy.
- 307 - Resource has been moved but only temporarily (normally done in server code)
One note on the redirection responses codes, it is better to do a 301 redirect, that is do it with the server.
To do a permanent 301 redirect - the one the search engines like.
In IIS
- 1. Go into IIS Manager
- Expand you website list and go into the properties for the site you want to redirect
- Click on the Home Directory Tab
- Select the A Redirection to a URL option
- Enter the new URL in the Redirect to box (including http://)
- Tick the exact URL entered above box
- Tick the A permanent redirection for this resource box
- Click Apply

This mean you have permanently moved your website. If you do not select the permanent redirect option, the redirection will be seen as a temporary redirect or a 302.
4## - This mean a client error has occurred, such as it cannot find or get to where it was heading, and is most commonly cause by an incorrect link or a typo.
The most common type of 400 error is the 404.
- 404 - Page Not Found or resource not found
There are alot of 400 errors that can occur but the other most common ones other than 404 are
- 400 - this is a bad request
- 401 - Access Denied - the client cannot access the resource because of credentials given
- 403 - This means the client cannot access the resource as it is forbidden to do so, normally caused by either a file error or IP restriction problem, or if your lucky just too users accessing your website at one time.
- 406 - client browser does not support server MIME type, can occur dut to old browsers
5## - This is a server error, most commonly due to coding problems
The most common 500 error is
- 500 - Internal server error - probably an error in the website code
About response codes
There are lots of error codes and this blog is aimed at giving you an idea of the most common ones and the causes of them.
Checking for response codes
If you are listening for a response code to be returned, teh best way is jsut to listen for the parent response, such as checked for a 200 reponse for a successful request.
Search Engine Listing and Redirection
The main things to take into consideration are when moving your website, and follow the instructions above to help you with your search engine listings, if you are moving your website make sure you do a 301 redirection.
Thanks
Sean J Connolly
Visit AJAX Web Development Store
DMS - Document Management, Webmail
BuzzProperties.co.uk - Online Property Sales and Letting
Wednesday, 7 May 2008
Ebay and Blogger - the Explanation
In this post I am going to explain the steps of turning your ebay Partner Network code into code that works in Blogger.
Ok so here we go.
Step 1 - Get your code from Ebay Partner Network
Looks like this
<script language='JavaScript1.1'> document.write("<sc"+"ript language='JavaScript1.1' src='http://rover.ebay.com/ar/1/55956/1?campid=5335857286&toolid=55956&customid=&mpt=" + Math.floor(Math.random()*999999999999) + "&adtype=3&size=468x60&def=u7v&n3y=1&u7v=1&a3h=1&mpvc='></sc"+"ript>");</script><noscript> <a href='http://rover.ebay.com/rover/1/710-53481-19255-7/1?campid=5335857286&toolid=55956&customid=&def=u7v&n3y=1&u7v=1&a3h=1&mpvc='> <img border='0px' src='http://rover.ebay.com/ar/1/710-53481-19255-7/1?campid=5335857286&toolid=55956&customid=&mpt=[CACHEBUSTER]&adtype=1&size=468x60&def=u7v&n3y=1&u7v=1&a3h=1&mpvc=' alt='Click Here'> </a></noscript>
Step 2 - Remove what we dont want
Ok firstly let me explain Ebay gives you a bunch of code that works for browsers that support JavaScript and for browsers that dont' support JavaScript or have it disabled.
So the bit we are only interested in really is the bit before the <noscript> section or in other words the bit that looks like.
<script language='JavaScript1.1'> document.write("<sc"+"ript language='JavaScript1.1' src='http://rover.ebay.com/ar/1/55956/1?campid=5335857286&toolid=55956&customid=&mpt=" + Math.floor(Math.random()*999999999999) + "&adtype=3&size=468x60&def=u7v&n3y=1&u7v=1&a3h=1&mpvc='></sc"+"ript>");</script>
A small word of warning you need the <noscript> section when you post your code to blogger, unless you do not want to cover non JavaScript browsers with your advert. So just cut this bit out and paste in into a text editor for later use.
So cut out the bit that looks like
<noscript> <a href='http://rover.ebay.com/rover/1/710-53481-19255-7/1?campid=5335857286&toolid=55956&customid=&def=u7v&n3y=1&u7v=1&a3h=1&mpvc='> <img border='0px' src='http://rover.ebay.com/ar/1/710-53481-19255-7/1?campid=5335857286&toolid=55956&customid=&mpt=[CACHEBUSTER]&adtype=1&size=468x60&def=u7v&n3y=1&u7v=1&a3h=1&mpvc=' alt='Click Here'> </a></noscript>
Ok now remove the following bits
DMS - Document Management, Webmail
BuzzProperties.co.uk - Online Property Sales and Letting
Ok so here we go.
Step 1 - Get your code from Ebay Partner Network
Looks like this
<script language='JavaScript1.1'> document.write("<sc"+"ript language='JavaScript1.1' src='http://rover.ebay.com/ar/1/55956/1?campid=5335857286&toolid=55956&customid=&mpt=" + Math.floor(Math.random()*999999999999) + "&adtype=3&size=468x60&def=u7v&n3y=1&u7v=1&a3h=1&mpvc='></sc"+"ript>");</script><noscript> <a href='http://rover.ebay.com/rover/1/710-53481-19255-7/1?campid=5335857286&toolid=55956&customid=&def=u7v&n3y=1&u7v=1&a3h=1&mpvc='> <img border='0px' src='http://rover.ebay.com/ar/1/710-53481-19255-7/1?campid=5335857286&toolid=55956&customid=&mpt=[CACHEBUSTER]&adtype=1&size=468x60&def=u7v&n3y=1&u7v=1&a3h=1&mpvc=' alt='Click Here'> </a></noscript>
Step 2 - Remove what we dont want
Ok firstly let me explain Ebay gives you a bunch of code that works for browsers that support JavaScript and for browsers that dont' support JavaScript or have it disabled.
So the bit we are only interested in really is the bit before the <noscript> section or in other words the bit that looks like.
<script language='JavaScript1.1'> document.write("<sc"+"ript language='JavaScript1.1' src='http://rover.ebay.com/ar/1/55956/1?campid=5335857286&toolid=55956&customid=&mpt=" + Math.floor(Math.random()*999999999999) + "&adtype=3&size=468x60&def=u7v&n3y=1&u7v=1&a3h=1&mpvc='></sc"+"ript>");</script>
A small word of warning you need the <noscript> section when you post your code to blogger, unless you do not want to cover non JavaScript browsers with your advert. So just cut this bit out and paste in into a text editor for later use.
So cut out the bit that looks like
<noscript> <a href='http://rover.ebay.com/rover/1/710-53481-19255-7/1?campid=5335857286&toolid=55956&customid=&def=u7v&n3y=1&u7v=1&a3h=1&mpvc='> <img border='0px' src='http://rover.ebay.com/ar/1/710-53481-19255-7/1?campid=5335857286&toolid=55956&customid=&mpt=[CACHEBUSTER]&adtype=1&size=468x60&def=u7v&n3y=1&u7v=1&a3h=1&mpvc=' alt='Click Here'> </a></noscript>
WE NEED THIS LATER SO KEEP IT SAFE
Step 3 - Breaking it apart
- Remove the <script lanuage='JavaScript1.1'>
- Remove the </script>
You should now be left with a JavaScript statement without the code enclosure, in other words something that looks like
document.write("<sc"+"ript language='JavaScript1.1' src='http://rover.ebay.com/ar/1/55956/1?campid=5335857286&toolid=55956&customid=&mpt=" + Math.floor(Math.random()*999999999999) + "&adtype=3&size=468x60&def=u7v&n3y=1&u7v=1&a3h=1&mpvc='></sc"+"ript>");
Ok now remove the following bits
- document.write("<sc"+"ript language="JavaScript1.1" src='
- '></SC"+"RIPT>");
You should now be left with something that looks likes the following
http://rover.ebay.com/ar/1/55956/1?campid=5335857286&toolid=55956&customid=&mpt=" + Math.floor(Math.random()*999999999999) + "&adtype=3&size=468x60&def=u7v&n3y=1&u7v=1&a3h=1&mpvc=
As you can guess this is the basic link to Ebay for our product. Copy and paste this link into a blank notepad document or into another text editor or development program.
WE NEED THIS LATER SO KEEP IT SAFE
Step 4 - Rebuilding what we want
Now we have the basic link for the link to ebay we need to assemble this into something that will work in Blogger.
Its a good idea to start building the new link from scratch either in your web development program or in notepad.
For this example we are going to start with a blank notepad document.
In your blank document
- Type <script language="JavaScript1.1"> press enter/return
- Type document.write(unescape("%3Cscript src='
- Paste directly after this the link you save earlier in step 3i.e http://rover.ebay.com/ar/1/55956/1?campid=5335857286&toolid=55956&customid=&mpt=" + Math.floor(Math.random()*999999999999) + "&adtype=3&size=468x60&def=u7v&n3y=1&u7v=1&a3h=1&mpvc=
- Type ' type='text/javascript'%3E%3C/script%3E")); press return/enter
- Type </script> press return/enter
- Paste the <noscript> section we saved in step 2
You now should have code in your document that looks like
<script language="JavaScript1.1">
document.write(unescape("%3Cscript src='http://rover.ebay.com/ar/1/55956/1?campid=5335857286&toolid=55956&customid=&mpt=" + Math.floor(Math.random()*999999999999) + "&adtype=3&size=468x60&def=u7v&n3y=1&u7v=1&a3h=1&mpvc=' type='text/javascript'%3E%3C/script%3E"));
</script>
<noscript> <a href='http://rover.ebay.com/rover/1/710-53481-19255-7/1?campid=5335857286&toolid=55956&customid=&def=u7v&n3y=1&u7v=1&a3h=1&mpvc='> <img border='0px' src='http://rover.ebay.com/ar/1/710-53481-19255-7/1?campid=5335857286&toolid=55956&customid=&mpt=[CACHEBUSTER]&adtype=1&size=468x60&def=u7v&n3y=1&u7v=1&a3h=1&mpvc=' alt='Click Here'> </a></noscript>
Step 5 - Adding it to Blogger
Now we have the code we need for our advert we simply login to our blogger dashboard and do the following
- Click Layout Tab
- Click the Page Element tab - if you dont see this you need to click to customise your template.
- Click add page element where you want your ad to appear
- In the pop up click the add HTML / JavaScript option
- Paste in your code from above and click save.
Congratulations you now have Ebay Partner Network code working on your website.
Thanks
Sean J Connolly
Visit AJAX Web Development Store
DMS - Document Management, Webmail
BuzzProperties.co.uk - Online Property Sales and Letting
Wednesday, 30 April 2008
CSS - what is it?
I thought I would touch on using CSS. That is Cascading Style Sheets.
CSS is the way that most modern websites are designed, simply put CSS is the code used for the style and layout of webpages.
CSS comes it 2 forms
DMS - Document Management, Webmail
BuzzProperties.co.uk - Online Property Sales and Letting
CSS is the way that most modern websites are designed, simply put CSS
CSS comes it 2 forms
- Linked / Embedded - this is either an external style sheet page that is directly linked to from a page or style included in the HEAD section.
- inline - this is when the CSS code is directly applied to a page element.
So how do you link an external style sheet to your page.
<link rel="stylesheet" type="text/css" href="{link to actual css file}">
Simply place this code in your HEAD section of your webpage and away you go.
Style Sheet Media
Ok so now we have a link to a stylesheet for our page, but in additon to the basic need for a style sheet to style your page within a normal web browser. You can addtionally specify which delivery a particular style sheet is for.
You can have your website look a certain way for people using your website in a normal browser, and a different way for people who print your page. For example an order form or similar.
The default action for CSS and if you use the code example above is for all viewing to look the same, if you wish to show your website different to different medias, you use one of the following.
The most common media types are as follows:
- all - defines the stylesheet for all formats, this is the default behaviour
- screen - defines the stylesheet for you by a web browser or on screen viewing
- print - defines the style sheet for use when your user is doing a print preview or print of you website.
In additional to the above you can additionally specify any of the following:
- aural - defines the stylesheet for screen scrapers / speech synthesizers
- braille - defines the stylesheet for use by tactile feedback devices.
- embossed - defines the stylesheet for braille printers (this is a print driven media)
- handheld - defines the stylesheet for use by handheld devices, pda, mobiles phones etc
- projection - defines the stylesheet for use by screen projectors presentations, including using over-head projector transparencies..
- tty - defines the stylesheet for fixed-pitch devices, such as terminals
- tv - defines te stylesheet for use by TV type devices.
to use any of the above media types simply add the media attribute to your link to your style sheet in your head section.
<link rel="stylesheet" media="print" type="text/css" href="{link to actual css file}">
the above example defines the stylesheet for use by the printer and print preview screen.
NOTE - the media type is case sensitive
A Basic Style Sheet
OK. Now we have a grasp on how to implement a stylesheet, how to do create a style sheet.
StyleSheet Elements
Stylesheets are styled again elements within your page, these elements can by defined by tag type i.e BODY or by id or class.
Page Tag Styling
Firstly we will start by the easy ones, page tags. So if we want to have all our page links to look a certain way we can just do the following
B {color:red } - this would define all bold elements as the color red
i.e <b>this is a bold red </b> and looks like this is a bold red
NOTE - you can apply style to any page tag, and in some cases tags have multiple actions which you can style against, such is the case for your page hyperlinks, as follows.
- a:hover - this defines the style for a page hyperlink when the mouse moves over the link
- a:visited - this defines the style for a page hyperlink for links that have been visited
Note - there is a colon between the tag and the action i.e a:hover
Element ID Styling
You can apply individual style to page elements for nay element you have given an ID to. So if we have a DIV element on our page with an ID of DIV1 we can apply style only to this element, by doing the following in our style sheet.
#DIV1 {color:red;}
the element on our page is defined by
and any contents in this div would be red
Again you can do this for any element on your page you have assigned an ID to.
Ok we have a way to individually style elements, but what if we want to have a set of object carry a similar look and feel, it would be time consuming to individually style each tag by ID. So in this case we assign a class for these elements.
Style By Class
To define a page element with a class just add the class attribute to the element, as follows:
<div class="thenameoftheclass">text</div>
To define the style for this class you do the following in you stylesheet.
.thenameoftheclass {color:red;}
NOTE - there is a full stop (.) before the class name in the style sheet.
A Basic Example - Using a embedded stylesheet
Embedded StyleSheets come in 2 types
- external stylesheet in a linked file
- stylesheet coded directly in the HEAD section
For this example for are going to create a basic HTML page and a 2 CSS stylesheets.
1. Create an HTML page with the following code in it
<head>
<!--this sets the link for stylesheet for the screen-->
<link rel="stylesheet" href="stylesheet.css" media="screen"/>
<!--this sets the link for stylesheet for printing-->
<link rel="stylesheet" href="printstylesheet.css" media="print"/>
</head>
<body>
<!-- this element has an ID of DIV1 and a class of div1_class -->
<div id="DIV1" class="div1_class">This is styled by the #DIV1 style and the div1_class<br />the font color is coded from the #DIV1<br />the border is coded by the DIV1_class</div>
<!-- this element has a class of div1_class -->
<div class="DIV1_class">This is styled by the DIV1_class</div>
<h1 class="screen">Please use the print preview of this page to see the different styles</h1>
<h1 class="print">This is the Print version of this page</h1>
</body>
</html>
2. Next create a stylesheet file in the same directory as the page above called stylesheet.css with the following code.
/*THIS IS THE STYLESHEET FOR SCREEN VIEWING*/
/*using body sets the body elements*/
body
{
background:#eeeeee;
font-family:arial,sans-serif;
}
h1.screen
{
display:block;
}
h1.print
{
display:none;
}
/*this sets style for the element with an id of div1*/
#div1
{
color:Red;
}
/*this sets the style for the elements using the class of div1_class*/
/*NOTE - More than 1 element can use the same class*/
.div1_class
{
border:1px solid #blue;
}
3. Next create a stylesheet file called printStyleSheet.css in the same directly as the code above, with the following code:
/*THIS IS THE STYLESHEET FOR PRINTING AND PRINT PREVIEW*/
/*using body sets the body elements*/
body
{
background:#ffffff;
font-family:Verdana,sans-serif;
}
h1.screen
{
display:none;
}
h1.print
{
display:block;
}
/*this sets style for the element with an id of div1*/
#div1
{
font-weight:bold;
color:green;
}
/*this sets the style for the elements using the class of div1_class*/
/*NOTE - More than 1 element can use the same class*/
.div1_class
{
border:10px solid #green;
}
Now if you run the newly create HTML page in your browser you will see the page elements styled from the stylesheet.css style sheet. Now open the print preview of this page adn you will now see a different view of the page, which is now styled by the printStyleSheet.css.
This example gives you a quick idea how to hide / show page elements and how to style for your screen and for your printer.
To code your embedded style sheet directly in the HEAD of your website you do the following
In The Head Section
<head>
<style>body{font-family:verdana,sans-serif;}</style>
</head>
<body>
this body has verdana font
</body>
</html>
A Basic Example - Inline Stylesheet
Directly styling the element
Simply put this mean adding the style attribute to your element as follows
<div style="{your style stuff}">this is styled</div>
As in the following example
<head>
</head>
<body>
<div style="font-family:verdana,sans-serif;">this body has verdana font</div>
</body>
</html>
This guide shows you how to use CSS to style your website or blog. There are lots of cool stuff you can do with CSS to make your website look cool and the same in all browsers. So just go nuts.
Thanks
Sean J Connolly
Visit AJAX Web Development Store
DMS - Document Management, Webmail
BuzzProperties.co.uk - Online Property Sales and Letting
Saturday, 26 April 2008
How to Send / Receive XML and Parse IT
Lets start from the beginning by explaining what is involved in using XML in our pages.
It basically consists of two main elements
Ok so how do we create these elements. Simple
To create the XML DOM, which is basically the holding point for your XML data you do the following
Dim XMLDOM
Set XMLDOM = Server.CreateObject("Msxml2.DOMDocument.3.0")
Ok so now that we have a place to put our XML now we need to put the data into it.
XMLDOM.load("yourxmlfile.xml")
So what have we just done, well we have created an XML DOM object to loaded a data island into it. This means that our variable XMLDOM now holds our XML data in its memory space. But what use is that if we cant see it, simple it means we can do what ever we like to get the information out of our XML file into our page.
For Example - If we are looking for a particular node (say the first node called item)
Set GetRootNode = XMLDOM.documentElement
Set FirstNodeText = GetRootNode.selectSingleNode("//item[0]/*").text
What we have done here is simple, the documentElement method pulls the parent node from the XML file, then the selectSingleNode allows us to pick any node we wish to or you can simply loop through all the nodes by using a for loop with the length of your nodes.
Load XML into Page and read First Contents
So to load an XML file and pull out the node value.
Firstly Create an XML file called ourxmlfile.xml as follows
<?xml version="1.0"?>
<fields>
<item>
<text>Text of first Item Node.</text>
</item>
<item>
<text>
Text of second Node</text>
</item>
</fields>
Then create an ASP page in the same directoy and enter the following code.
Dim XmlDOMDoc, GetRootNode
Set XmlDOMDoc = Server.CreateObject("Msxml2.DOMDocument.3.0")XmlDOMDoc.load(Server.MapPath("ourxmlfile.xml"))
Set GetRootNode = XmlDOMDoc.documentElement
response.write GetRootNode.selectSingleNode("//item[0]/*").text
When you run this page you should see the value of the first node in your browser.
Send XML / Form Data using XMLHttp
So what if we want to send XML to this page?
Again create the necessary page objects as follows
Dim XmlHttp, ResponseXml
Set XmlHttp = Server.CreateObject("Msxml2.ServerXMLHTTP.3.0")
NOTE - this time we ate creating an XMLHTTP oibject not the XMLDom
Then open the HTTP using the XML and POST your data as follows
XmlHttp.Open "POST", "http://someurl.com/yourpage", false
Once we have opened the pipe to send the data we just need to set the type of data we are send and send it on its way
XmlHttp.SetRequestHeader "Content-Type", "application/xml; charset=UTF-8"
XmlHttp.Send SomeDatatoSend
Note - this will send the data as XML data if you just wish to post your data as name/value pairs, just like your would when submitting a form, just change the lines above to the following
XmlHttp.SetRequestHeader "Content-Type", "application/x-www-form-urlencoded"
XmlHttp.Send SomeDatatoSend
Note SomeDatatoSend is just a variable contained what you wish to send, it can be anything you like.
for example - SomeDatatoSend = "
Once we have sent it we need to listen for the response, either in the response text
XmlHttp.ResponseText
Note - when checking this you will get full response text back
or in the server status returned
XmlHttp.status
Note - when checking for this you will get the normal HTTP response codes back, i.e 200 is OK
So the complete code to send your data looks like
Dim XmlHttp, ResponseXML
Set XmlHttp = Server.CreateObject("Msxml2.ServerXMLHTTP.3.0")
XmlHttp.Open "POST", "http://someurl.com/yourpage", false
xmlhttp.setRequestHeader "Content-Type", "application/x-www-form-urlencoded"
XmlHttp.Send SomeDataToSend
Set ResponseXML= XmlHttp.ResponseText or XmlHttp.status
So now you are able to send data using XML and parse XML which is either posted to a page or loaded as a data island, your options are endless.
Happy XMLing
Thanks
Sean J Connolly
Visit AJAX Web Development Store
DMS - Document Management, Webmail
BuzzProperties.co.uk - Online Property Sales and Letting
Wednesday, 23 April 2008
Ebay Affiliates and Blogger
 | & |
You may experience issues when trying to add your ebay listing from your affiliates account to your blogger blog, this is caused by the way Blogger compiles the elements of the blog at runtime.
To fix this is quite simple.
For example if we have the following code from Ebay
<script language='JavaScript1.1'> document.write("<sc"+"ript language='JavaScript1.1' src='http://rover.ebay.com/ar/1/55972/1?campid=5335857286&toolid=55972&customid=&mpt=" + Math.floor(Math.random()*999999999999) + "&adtype=3&size=728x90&def=u7v&n3y=1&a3h=1&u7v=1&mpvc='></sc"+"ript>");</script><noscript> <a href='http://rover.ebay.com/rover/1/710-53481-19255-15/1?campid=5335857286&toolid=55972&customid=&def=u7v&n3y=1&a3h=1&u7v=1&mpvc='> <img border='0px' src='http://rover.ebay.com/ar/1/710-53481-19255-15/1?campid=5335857286&toolid=55972&customid=&mpt=[CACHEBUSTER]&adtype=1&size=728x90&def=u7v&n3y=1&a3h=1&u7v=1&mpvc=' alt='Click Here'> </a></noscript>
It looks pretty complex, b ut all we need to do is firslty ignore the <noscript> section as thsi will work as it is, in all browsers as there is no complicated stuff going on here.
So the bit we are interested in is the first bit
<script language='JavaScript1.1'> document.write("<sc"+"ript language='JavaScript1.1' src='http://rover.ebay.com/ar/1/55972/1?campid=5335857286&toolid=55972&customid=&mpt=" + Math.floor(Math.random()*999999999999) + "&adtype=3&size=728x90&def=u7v&n3y=1&a3h=1&u7v=1&mpvc='></sc"+"ript>");</script>
The problem blogger encounters is that is cannot encode this into the existing structure, so all we need to do is play around with the JavaScript a bit and turn the above code into the following
<script language='JavaScript1.1'> document.write(unescape("%3Cscript src='http://rover.ebay.com/ar/1/55972/1?campid=5335857286&toolid=55972&customid=&mpt=" + Math.floor(Math.random()*999999999999) + "&adtype=3&size=728x90&def=u7v&n3y=1&a3h=1&u7v=1&mpvc=' type='text/javascript'%3E%3C/script%3E"));</script>
As you can see what we are doing is using a slightly more complex method to do the same job, by using the unescape command we are asking the browser to do the work and not blogger.
So all you need do is replace the necessary parts of your ebay affiliate code with that above and everything should be fine.
If anyone has any problems doing this, just drop me an email and I will show you how.
Happy Ebaying.
Thanks
Sean J Connolly
Visit AJAX Web Development Store
DMS - Document Management, Webmail
BuzzProperties.co.uk - Online Property Sales and Letting
Add AJAX page element
This will be a nice quick tip, simply how to use JavaScript to add a page element. The page element can be anything that you can normally do in HTML.
So how do we use JavaScript to Add a Page Element?
Ok say you want to add a new div element to your page, either on a button click, page load or something else. All you need to do is the following
You should have a page element that says Your inner HTML
DMS - Document Management, Webmail
BuzzProperties.co.uk - Online Property Sales and Letting
So how do we use JavaScript to Add a Page Element?
Ok say you want to add a new div element to your page, either on a button click, page load or something else. All you need to do is the following
1. Add a page element called apagediv as follows <div id="apagediv"></div> 2. Then just use the code below <script> pagediv = document.getElementById("apagediv") newdiv = document.createElement("div") pagediv.innerHTML = "Your inner HTML"; pagediv.appendChild(newdiv) </script> |
You should have a page element that says Your inner HTML
Lets break it down a bit
- document.getElementByID - finds the page element with the specified ID
- document.createElement - create a page element, thsi can be any page element, but at this point it is only created in page memory
- pagediv.innerHTML - this sets the innerHTML property of the newly created element, again this can be any of the attributes for your element i.e src, style or what ever.
- pagediv.appendChild - this actually places your newly created element on the page, as the child of the found pagediv, again this can be any element including the body. But using a div gives slightly better page layout.
Well this ends this little tip.
Now if anyone out there has anything you would like to knwo how to do, just drop me an email and I will post a response on this blog.
Thanks
Sean J Connolly
Visit AJAX Web Development Store
DMS - Document Management, Webmail
BuzzProperties.co.uk - Online Property Sales and Letting
Thursday, 17 April 2008
Table vs Tableless layout
For a long while it has been the done thing to lay your website out using tables, instead of a CSS based layout.
Now there are 2 trains of thought on this.

DMS - Document Management, Webmail
BuzzProperties.co.uk - Online Property Sales and Letting
Now there are 2 trains of thought on this.
- It takes time to lay your website out using just CSS, so why bother.
- Tables are more browsers friendly, and alot easier to do.
Ok I will address these one at a time. It is true that it takes time to lay your website out using CSS. But the benefits far out weight the time taken, not only willl your website look the same in all browsers but it will also be a better and more friendly site for the search engines.
Spending time learning and laying your website out using CSS, will help improve your search engine rankings, and will also make your website easier to manage.
Now tables, you should only ever use table for when your want to display tabular data, this can be anything you wish to show on your website, your prices, a menu or some other list.
Dont use tables for the body of your website, it is not current coding and will have a very harmful effect on your promotional efforts.
So remember use your time wisely and learn the skills you need, learn basic CSS and you will be able to lay out your website.
Thanks
Sean J Connolly
Visit AJAX Web Development Store
DMS - Document Management, Webmail
BuzzProperties.co.uk - Online Property Sales and Letting
Monday, 14 April 2008
What is Web 2.0 and Blogging?
Ok you may have heard alot about web 2.0 and blogging. The question is what is it?
Simple
Web 2.0 - in a nutshell is any website that lets the user interact with the website, whether it is writing a book review on amazon or giving feedback on Ebay
 about someones product. This is all web 2.0 is. It is simply a step on from the DHTML website, with the addition of letter the user input onto the site.
Blogging - This is really an online journal or your thoughts about something, this thing you are reading is a Blog, its like a mini website. It comes from the web log, which is the log that your web server keeps of all the activity through it. So a blog is essentially your reflection of the world and any given subject, from your working day to your favourite topic.
Thanks
Sean J Connolly
Visit AJAX Web Development Store
DMS - Document Management, Webmail
BuzzProperties.co.uk - Online Property Sales and Letting
Simple
Web 2.0 - in a nutshell is any website that lets the user interact with the website, whether it is writing a book review on amazon
Blogging - This is really an online journal or your thoughts about something, this thing you are reading is a Blog, its like a mini website. It comes from the web log, which is the log that your web server keeps of all the activity through it. So a blog is essentially your reflection of the world and any given subject, from your working day to your favourite topic.
Thanks
Sean J Connolly
Visit AJAX Web Development Store
DMS - Document Management, Webmail
BuzzProperties.co.uk - Online Property Sales and Letting
Sunday, 13 April 2008
SQL Server Backup

Now I am going to discuss SQL server, as most people know this is the database offering from Microsoft. It is offered in many different forms from a cut down express edition right up to a full blown data centre enterprise edition.
I recommend the following great books for more on this topic.
SQL Server 2000 Backup and Recovery (Database Professional's Library)
Sql Server Backup and Recovery
Sams Teach Yourself SQL Server 2005 Express in 24 Hours (Sams Teach Yourself)
Microsoft SQL Server 2005 Express Edition for Dummies: Express Edition (For Dummies): Express Edition
If you want to know more about SQL Server please see the Microsoft website
Don't have the express edition or still using the MSDE (which is not longer supported by the way) - Go Here
(don't download the version with advanced features unless you plan on carrying out reporting on your DB, in most case you wont. So save yourself time and download the other one.)
As many people know that if you are working in a large organisation and developing against the full edition you get the benefits of having access to services such as full replication and DTS. No if you are not developing against this edition you don't have these features, as more often than not people are developing locally on either the MSDE / Express edition or they are developing locally with a full version buy host their solution somewhere which they either only have RDC access or they dont have enough access to install another on the server.
Now this causes problems with how to backup and keep a safe copy of you database, because if you are running mixed versions of SQL Server, such as full locally and express on your server, or express on both. Then you cannot setup a DTS schedule to carry out your backups.
The Ideal Solution
Ok here is the ideal solution and the one you will have if you are working for a company with the correct infrastructure. This solution is simple.
| Local | Deployment/Server | Backup Solution |
| SQL Server (any full edition) | SQL Server (any full edition) | Scheduled DTS packets |
This assumes that you are not running the development version on your local machine
Now with this solution providing you have access to the deployment both over a network connection, you can have a scheduled DTS package deployment to handle your backups.
Now the main problem is that alot of developers as actually developing against the express edition and only deploying to a server that is running the same version.
So the question here is why cannot I just do a DTS scheduled back up?
The answer is simple, the express version of SQL server is a cut down version and cannot support the broadcasting relationship necessary to have a scheduled DTS backup.
The art of using DTS fails into the area of replication, and in order to support full replication of a database you need both to be full versions.
The Most Common Situation
Now in most cases developers are working against the free express editions, and this means that they are deploying their solution on this version also. In this scenario most people are sending the files to their server by FTP, and may have RDC access.
| Local | Deployment/Server | Backup Solution |
| SQL Server Express / Development Edition | SQL Server Express | Scripted / Backup Scheduling |
Now in this case we cannot do a DTS replication to keep a nice copy of our database safe so there are two solutions.
- A direct DB backup or restore
- A Scripted SQL Backup
Now in this article I am only going to go into the Scripted backup, and the reason for this is it allows you to compile the SQL script on your server into a location that you have FTP access to them simply download the SQL file.
Ok onto the nitty gritty. How do you do it.
- Log on to your SQL Server database.
- Right click on your database and go into the script option.
- Inside here you normally get 2 option CREATE and DROP. These are simple one with just create your backup the other with drop your existing DB and then create your backup.
- Simply select the one of preference, my preference is DROP, and pick a location.
Once you have this file on your server in a location where you can FTP it, copy it to your local machine, once there. Run this script on your local DB, make sure you point it at the correct DB.
WARNING - IF YOU FTP THE FILE DOWN MAKE SURE YOU DELETE / MOVE THE FILE LOCATION ON YOUR SERVER FROM WHERE YOU HAVE FTP ACCESS TO IT. REMEMBER IF YOU HAVE FTP ACCESS SO DOES EVERYONE ELSE.
There you have it a full backup of your database nice and safe.
I have to say it is possible to have remote access to your SQL Server on your web-server, but this means opening up all sorts of security concerns, including but not limited to the default SQL server port. Oh by the way that is 1433 in case you are wondering.
Because of the security issues of opening up a public SQL Server box for access via remote network connections I will not go in to the solution of how to connect and copy data, all through your local SQL management express console.
Now there is a slight exception to this, if people want me to go into how to access your SQL server box directly from your local machine I can do. But you will have to ask me nicely.
So if you want to know how to gain access to your remote SQL Server box from your local machine, just say so in your comment.
Sean J Connolly
Visit AJAX Web Development Store
DMS - Document Management, Webmail
BuzzProperties.co.uk - Online Property Sales and Letting
Subscribe to:
Comments (Atom)
